Don’t know much about solar?
This is the right page to start. I will try to explain the basics in very simple terms.

Introduction
An off-grid system is more than just a way to generate electricity—it’s a lifestyle choice that brings independence and sustainability. If you own a camper or RV, having a 12V off-grid system can transform your travels, allowing you to power your appliances and devices no matter where your journey takes you.
12V off-grid systems are a popular choice among the RV and camper community due to their simplicity, efficiency, and suitability for smaller loads, such as lighting, small appliances, and charging devices. These systems are also scalable, which means they can be adjusted to meet individual needs.
In this guide, we are going to talk about the following:
- Terminology: Power units and formulas
- Basic breakdown of the components
- Solar panels
- Charge controllers
- Batteries
- Battery chargers
- Inverters
- Wire sizing
- Fuse sizing
Let me know your thoughts or questions on this introductory guide by contacting me here.
Grab yourself a drink and let’s get started!
Terminology
This is going to be a bit boring but we have to get through it.
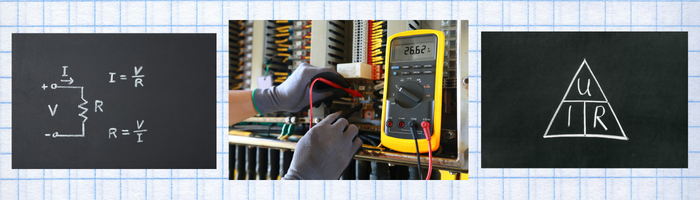
We have Volts and Current or Amps both abbreviated as (V) and (A).
If we multiply volts by current we get watts. This is the formula:
Watts = Volt x Amps
Let say you have a solar panel which is rated at 25V and 4 Amps. You then get:
25 Volts x 4 Amps = 100 Watts
There you go! You just calculated the power of a solar panel!
If we compare electricity to water and use a hose as an example, we can say that voltage is the speed or pressure of water flow. And Current is the amount of water that comes out of the hose.
If we multiply the speed of the water and the amount we become the volume of the water.
Now if we increase the diameter of the hose, we can increase the current. If we increase the current we also increase the amount of water.

See where I’m getting at?
Diameter of the hose = diameter of the wire
Increase the diameter of the hose = more power can come through
Watts = Volts x Amps
Amps = Watts / Volts
Volts = Watts / Amps
Breaking down the components
Solar panel(s)

To harvest the sun’s energy, we need to use solar panels. These will be placed on the top of your roof. If you don’t have enough space on your roof, you can store the panels in your vehicle and take them out when parked.
Panels should be facing the sun at all times for optimal energy harvest. However, when the panels are flat on the roof, you will lose out on some power. Expect a 100W panel to deliver around 60-70 Watts in full sun.
We have three major categories of solar panels. These are:
- Mono
- Poly
- Flexible
The most important information you must know is that Mono is slightly smaller than Poly for the same power. So if you have space constraints like the roof of a van, you should choose Mono.
If you do not have space constraints like a ground mount, you can choose Poly. Poly is a little bit cheaper than Mono.
I do not recommend using flexible panels because they will heat up quickly and therefore lose efficiency and will have a limited lifespan. They are great for curved surfaces.
Resources:
- Article: Mono Vs Poly panels
- Watch Video Mono Vs Poly panels
- Article: Best tilt angle for solar panels
- Article: Mixing different solar panels
- Article: Best way to wire your panels for shading
- Article: Series or parallel wiring of solar panels
- Watch Video: Series or parallel wiring for solar panels
Charge Controller
We need to bring the energy harvested from the solar panels into a battery. But we cannot just directly connect the solar panels to the battery. If we do this, the battery will get damaged.
A 100W solar panel typically brings in 18V, but the batteries should be charged at 13V. Therefore we need to have a kind of regulator in between the solar panels and the batteries.
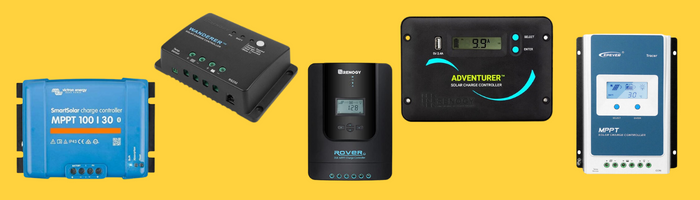
This regulator is called a solar charge controller. Some people call it a converter but I find that confusing because it sounds like an inverter, which is a totally different component which I will talk about soon.
There are two kinds of solar charge controllers:
- PWM
- MPPT
A PWM is the cheapest and the most inefficient of the two. If your 100W solar panel produces 70 Watts then the PWM will reduce it even more to about 50 Watts. A PWM is about 60-70% efficient. A PWM is good for small solar systems up to 100W (in my opinion). It is important that you keep the solar panel voltage as close to the battery voltage as possible. So if you have two 100W panels and a 12V battery, you must wire the solar panels in parallel.
An MPPT is much more efficient but is going to cost more. I recommend it for systems that are 100W and up. You will find two ratings on an MPPT charge controller. For example, 75/15. This means that the maximum input voltage of the charge controller is 75 Volts, and the charge current to the battery is 15 Amps. You can find more information about sizing in the resources below.
Every charge controller has different charge settings. This is because lead-acid batteries have to be charged at a different voltage an phases than a lithium (LiFePO4) battery. Ensure you get a charge controller with the correct charge settings for your type of battery. Most charge controllers I recommend have both (lead-acid and lithium).
Learn More:
- Article: How does a solar charge controller work?
- Article: What size MPPT controller do I need?
- Article: PWM vs MPPT
- Article: Connecting multiple solar charge controllers to one battery
- Buying Guide: Best PWM charge controller
- Buying Guide: Best MPPT charge controller
- Article: DC surge protection for solar panels
Battery

The energy from the solar panels passes through the charge controller into the batteries.
We can have two major types of batteries, these are:
- Lead acid (Gel, AGM, flooded lead-acid)
- Lithium (LiFePO4)
The oldest category are the lead acid batteries. There are several types of them, such as Gel, AGM (Absorbent Glass Mat), and Flooded Lead Acid. They have been used for decades in off-grid solar setups, from RVs to home systems. These types of batteries are cheap upfront, but they have their limitations like only being able to be discharged to 50% to increase their lifespan. These kinds of batteries can only have 500 cycles (one cycle is from 50% to 100%).
Gel and AGM batteries are known as sealed lead acid batteries. They require less maintenance and are safer to use in enclosed spaces, like in an RV or camper, due to their sealed nature preventing acid leakage. However, their lifespan is significantly lower than their lithium counterparts.
Flooded Lead Acid batteries, on the other hand, are the traditional car batteries we all know. They are cheaper but require regular maintenance, such as topping up with distilled water and equalizing charges. Moreover, they need proper ventilation due to the production of hydrogen gas during charging. Therefore I do not recommend using flooded lead-acid batteries (especially in a vehicle).
Lithium Iron Phosphate (LiFePO4) batteries are becoming increasingly popular in off-grid systems. Although more expensive, they are more efficient, lighter, and can offer a longer lifespan than lead-acid batteries. They can be discharged 100% without a significant impact on their lifespan, which effectively gives you more usable capacity. Another advantage is their ability to handle high charge and discharge rates.
When selecting a battery, consider your energy needs, budget, and available space. There’s no point in having a huge battery bank if your solar panels can’t charge it adequately.
One last aspect to consider is temperature. Different battery types perform differently in varying temperatures, so consider this based on your travel and usage patterns. For instance, LiFePO4 batteries generally can’t be charged below-freezing temperatures unless they have built-in heating elements.
There is a growing community of people who build their own Lithium batteries. This is because it’s cheaper and you have more control over the cells and BMS. Going into depth about this here will be out of the scope of this guide. Therefore I will refer you to my guide on making a DIY LiFePO4 battery.
Learn more:
- Article: Lead-acid vs Lithium batteries cost
- Article: Replacing lead acid with lithium batteries
- Article: Why a 48V battery is better than a 12V battery
- Article: How many batteries do you need for Off-grid?
- Article: Are LiFePO4 batteries safe?
- Article: Batteries in series or parallel
- Buying Guide: The best lithium batteries for solar
Battery Terminology
I will sprinkle in a little bit of battery terminology. When deciding to buy a battery, these will come in handy.
These are the most important specifications you need to know about a battery:
- Ah
- Wh
- C-rate
Ah (Ampere-hours): This unit measures the battery capacity. A battery rated at 100 Ah can theoretically deliver a current of 1 ampere for 100 hours, 2 amperes for 50 hours, and so on. However, the actual usable capacity will be different because we can only use 50% of a lead-acid battery in order to extend it’s lifespan. So a 100Ah lead-acid battery can only deliver 50Ah of energy (50% DOD). While a 100Ah lithium battery can deliver 80Ah (80% DOD).
Wh (Watt-hours): This is another measure of battery capacity. It considers both the current (amperes) and the voltage (volts) supplied by the battery. A battery rated at 100Ah at 12V has a capacity of 1200Wh (100Ah x 12V). This is a more accurate way of telling the energy stored in a battery. Because the total stored energy is depending on the battery’s voltage.
C-rate: The C-rate of a battery defines its charge and discharge rates. It’s a measure of the current at which a battery is charged/discharged relative to its capacity. A lead-acid battery has a C-rate of 0.2C while a lithium has a C-rate of 0.5 to 1C. This means that the maximum charge and discharge current of a 100Ah lead-acid battery is:
0.2C x 100Ah = 20A charge and discharge current
While a lithium battery can have a maximum charge and discharge current of:
1C x 100Ah = 100A charge and discharge current
You can increase the current, but that will negatively impact the efficiency and lifespan of the battery.
Learn More:
- Watch Video: C-rate
- Article: Depth of Discharge for lithium batteries (DOD)
Battery chargers
Once your solar system is set up, you’ll find there may be times when you need to supplement your energy collection with other methods. This is where battery chargers come in. They are a versatile option for replenishing your battery bank.
Charge from the Alternator
There are two main methods of charging your batteries directly from your vehicle’s alternator:
Battery Isolator: This device allows your vehicle’s alternator to charge your house battery while driving without linking your house battery and starter battery together when the vehicle is off. It isolates the two systems to prevent discharging your starter battery.
B2B (Battery-to-Battery) Charger: This is a more advanced method that also allows charging from your vehicle’s alternator. The B2B charger manages the charge between your starter battery and your house battery, ensuring each battery gets the appropriate charging profile. This method is more efficient and better for the lifespan of your batteries, especially when using different types of batteries in your system (like a lead-acid starter battery and a LiFePO4 house battery).
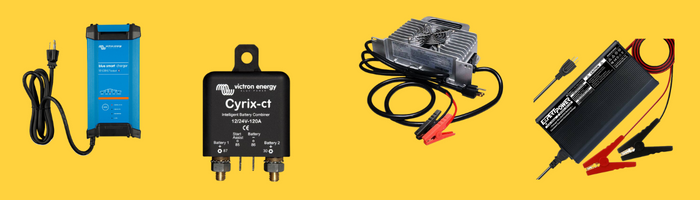
Charge from Shore Power
Shore power provides an alternative charging source when you’re parked and have access to grid electricity.
Battery Chargers: To charge from shore power, you’ll need a battery charger suitable for your specific battery type. This device converts AC power from the grid into DC power to charge your batteries. It’s vital to select a charger that meets your battery’s specifications to ensure they are charged safely and efficiently.
Read more:
- Buying Guide: B2B chargers
- Article: Isolated vs non-isolated dc to dc chargers
- Article: Can a car alternator charge your battery?
- Article: How many amps should I charge my LiFePO4 battery with?
- Article: Battery charging in series or parallel
- Article: How long it takes to charge a lithium battery
- Article: How do you charge a LiFePO4 battery?
- Buying Guide: Best chargers for LiFePO4
Inverter

We are almost there! You are doing great, keep on reading.
The power stored in your batteries is in Direct Current (DC) form. However, many appliances require Alternating Current (AC) to operate, such as laptops, microwaves, TVs, or coffee makers. To use these, we’ll need to convert DC power into AC power, which is where the inverter comes into play.
Different Types of Inverters
Inverters come in two main types, based on the type of wave they produce:
Modified Sine Wave: These are the more affordable option and can power many basic appliances. However, they may cause issues with some sensitive electronics and aren’t as efficient as pure sine wave inverters. Do not use these to charge your laptop or other batteries like a camera, as they can produce a humming noise, and the electronics will fail early.
Pure Sine Wave: These inverters create a smooth, natural wave similar to what you’d get from grid power. They can power any AC appliance without issue but are generally more expensive than their modified sine wave counterparts. Use this kind of inverter to power electronics.
Different Kinds of Inverters
Inverters also differ in their frequency characteristics:
Low Frequency: These inverters are typically heavier and more expensive but are more robust, reliable, and can handle higher power loads. They’re ideal for powering work tools because they can handle a high surge current. A surge current is what happens when you start an electrical motor. This will be up to 8 times the normal current. Because low-frequency inverters have a big coil inside of them, hence why they are so heavy.
High Frequency: These inverters are lighter and less costly, suitable for smaller loads or portable applications. They may not be as durable as low-frequency inverters. They have switching electronics inside, that’s why they are so light. The electronics are not suited for high surge currents. Read more about these two in the ‘learn more’ section.
Inverter Combinations
Inverters can also be categorized based on their additional functionalities:
Normal Inverter: These are straightforward devices that only convert DC to AC power. We have just talked about these previously.
Inverter/Charger: These are two-in-one devices that not only convert DC to AC power but can also convert AC to DC power to charge your batteries when connected to shore power.
Hybrid Inverter: These inverters take it a step further, combining the functionalities of an inverter, charger, solar charge controller, and also a transfer switch. This allows them to switch between solar and shore power seamlessly.
Learn more:
- Article: What is a pure sine wave inverter?
- Article: Low frequency Vs High frequency inverters
- Buying Guide: Best off-grid inverter
- Article: What inverter size for fridge?
- Article: What size inverter do you need for a microwave?
- Article: Two inverters on one battery bank
- Article: How many batteries for a 2000W inverter?
- Article: How many batteries for a 3000W inverter?
Wires

You’re doing great! Now, let’s talk about wires. Wires are like the veins of your solar system, carrying the lifeblood of electricity from one component to another. Choosing the right wire is crucial for the efficiency and safety of your system.
Calculating Wire Size
The wire size you need depends on two main factors: the amount of current that will flow through it and the length of the wire.
For example, if you’re connecting solar panels to a charge controller, you’ll need to consider the maximum amount of current that will flow through the wire and the length of the wire. You can use a voltage drop calculator to help you determine the right wire size.
You can use a simpler calculation to connect components like the charge controller, battery, and inverter. First, calculate the current that can go through the wire. Then, apply a safety factor to find the minimum current capacity your wire should have. All of this is written in my detailed article in the ‘Learn More’ section at the end of this chapter.
Different Types of Wires
Wires can be categorized by their material, core design, and insulation.
Material: Wires can be made of copper, aluminum, or copper-clad aluminum (CCA). Copper wires are the most conductive and durable but also the most expensive. Aluminum wires are lighter and cheaper but less conductive. I only recommend using these pure copper wires in your whole DC installation.
Core Design: Wires can have a solid core or a stranded core. Solid core wires are more robust but less flexible, making them suitable for outdoor use. Stranded core wires are more flexible and easier to work with, making them ideal for most applications. We will use stranded wires for DC and solid core for AC.
Insulation: The insulation of a wire can be made from different materials, such as polyvinyl chloride (PVC), rubber, or cross-linked polyethylene (XLPE). The best wire is marine graded with a high insulation temperature, and it is very easy to work with because of its flexibility. Another alternative is speaker wire for smaller conductors.
The temperature of the wiring insulation plays a significant role in how much current it can carry. For example, an 8 AWG wire is rated at 40 Amps with an insulation temperature of 60°C or 140°F while the same 8 AWG wire can be rated up to 55 Amps at 90°C of 194°F insulation temperature.
Choosing the Right Wire
Different parts of your solar system will require different types of wires.
Solar Panel Wiring: Solar panels require wires that can withstand harsh environmental conditions. PV wires are specially designed for this purpose and can withstand high voltages.
DC wiring and Battery Cables: Battery cables must withstand high heat as batteries charge and discharge. These are the wires I recommend for thick wire runs.
Wires for AC Applications: AC applications can use most wires, varying the wire on the particular application. Since AC wires are usually passed around in conduit, they do not tend to require chemical-resistant insulators.
Learn More:
- Article: How to calculate wire size
- Watch Video: Voltage drop in solar systems
- Article: Wire types for solar power systems
Fuses

Great job on getting this far! Let’s discuss a vital safety component in your solar power system – the fuse.
Fuses are like the guardians of your solar system. They protect your system’s wires from overheating and potentially causing a fire. Remember, a fuse protects the wire, not the appliances.
Why Do We Need Fuses?
Every wire in your solar system can potentially overheat and melt. This is why we use fuses. If too much current flows through a wire, the fuse will ‘blow’ or ‘trip’, breaking the circuit and stopping the flow of electricity. This prevents the wire from overheating and melting. We need to fuse every positive (red) wire. The black wire can be left alone because that’s the return path of the current. Everything that goes through the red wire passes the black wire.
How to Choose the Right Fuse?
Choosing the right fuse depends on the wire size and the amount of current that will flow through it. The fuse size should be larger than the current you expect to flow but smaller than the maximum current the wire can handle.
For example, if a wire is expected to carry 15 Amps, you need to multiply it by 1.25 to become:
15 Amps x 1.25 = 18.75 Amps
We need a fuse greater than 18.75 Amps, which will be 20 Amps. Then select the wire size which can carry at least 20 Amps.
This is explained in simple terms. Read my article linked in the ‘Learn more’ section.
Different Types of Fuses
Just like inverters, there are different types of fuses. The right one for you depends on your system’s voltage and the maximum current that could flow if something goes wrong (known as the interrupting current capacity). Some fuses are better suited for lower voltage systems (like 12V and 24V), while others can handle higher voltage systems (like 48V).
Learn more:
Conclusion
Congratulations! You’ve made it through the basics of setting up a 12V off-grid solar system. We’ve covered a lot of ground, from understanding basic electrical terms to choosing the right components for your system.
We started with the basics of electricity, understanding terms like volts, amps, and watts and how they relate. We then delved into the components of a solar system, starting with solar panels, which harvest the sun’s energy. We learned about the different types of panels and their pros and cons.
Next, we discussed charge controllers, which regulate the energy from solar panels to batteries. We compared PWM and MPPT controllers and discussed their efficiency and cost.
We then moved on to batteries, the heart of your solar system, where the energy is stored. We compared lead-acid and lithium batteries, discussing their capacity, lifespan, and cost.
We also touched on battery chargers, which provide an alternative way to charge your batteries when solar energy is insufficient. We discussed charging from the alternator and shore power.
Next, we discussed inverters, which convert DC power from your batteries to AC power for your appliances. We learned about different types of inverters based on the wave they produce and their frequency characteristics.
We then moved on to wires, which carry electricity from one component to another. We discussed calculating the right wire size and the different types of wires based on their material, core design, and insulation.
Finally, we discussed fuses, a vital safety component that protects your system’s wires from overheating.
Remember, setting up a solar system is not just about generating electricity; it’s about embracing a lifestyle of independence. It may seem daunting initially, but with the proper knowledge and tools, you can set up a system that meets your needs.
This guide is just the beginning. There’s much more to learn about solar power, and I encourage you to continue exploring and asking questions. Solar power is constantly evolving, and there’s always something new to discover.
Thank you for joining me on this journey. I hope you found this guide helpful and inspired you to take the next step in your solar power journey.