Harnessing solar power for off-grid systems in camper vans, boats, or cabins requires understanding busbars.
Often overlooked, these play a vital role in managing your power distribution.
Want to know more about what they do and why you need them? Read on…
What is a Busbar for 12V, 24V, or 48V?
At the most basic level, a busbar is a conductive material, often a thick strip or bar of copper, brass, or aluminum, that distributes electrical power from one point to multiple locations in your system. It is a centralized hub for all power connections, ensuring electricity is efficiently and effectively distributed.
The application of busbars is not exclusive to any specific voltage. Whether you’re working with a 12V, 24V, or 48V system, a busbar will play its part in distributing power. However, the busbar’s size, material, and design will vary based on your system’s current. The higher the current, the greater the size of the busbar.
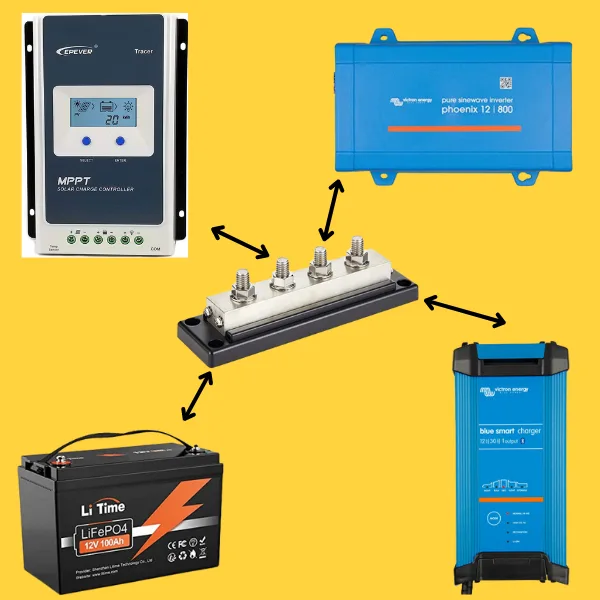
In the context of a DIY solar system like those found in camper vans or cabins, busbars help manage connections from solar panels, batteries, inverters, and charge controllers, allowing for a cleaner and more organized setup.
What is the Purpose of a Busbar?
A busbar is used for electrical connections, ensuring power is efficiently distributed to various devices or circuits from a single source. Think of the busbar as the heart of your electrical system, pumping energy throughout. Busbars promote easy management, troubleshooting, and safety by concentrating the distribution in one place.
If your battery terminals have three or more leads attached, then it’s time to move on to a busbar.
It is only allowed to have three lugs on one battery stud. In most systems, more than three leads will go to the battery. Therefore a busbar is required.
How to Size a Busbar
Sizing a busbar for off-grid solar applications involves several factors, including the maximum current that the busbar will need to carry, the material of the busbar, and the allowable temperature rise. Here’s a general guide on how to size a busbar:
- Determine the Maximum Current: The first step in sizing a busbar is to determine the maximum current that the busbar will need to carry. This is typically the sum of the maximum output currents of all the charge controllers and inverters connected to the busbar. For example, one charge controller with a maximum output of 30Amps and an inverter that draws 100Amps. If you add these two together, you become 130 Amps. I also recommend applying a safety factor of 125%. Now we will have 130A*1.25=162A
- Choose the Busbar Material: Busbars are typically made of copper or aluminum, which have different electrical and thermal properties. Copper busbars are more conductive and can carry more current than aluminum busbars of the same size but are more expensive.
- Choose the amount and size of the studs: Some busbars have M4 studs, while others have M8 studs. M8 studs are most used in higher current systems, while M6 studs are meant for smaller current ratings. M8 studs are ideal for wire lugs.
- Check the Busbar Dimensions: Finally, check that the physical dimensions of the busbar (length, width, and thickness) are suitable for your installation. The busbar should be thick enough to carry the current without overheating but not so large that it’s difficult to install or too expensive for the limited current you put through it.
I have made a guide on how to make your own DIY busbars. Check my guide out here: How to make a DIY busbar
How to Wire a 12V Busbar
Here I will show you a busbar wiring diagram.
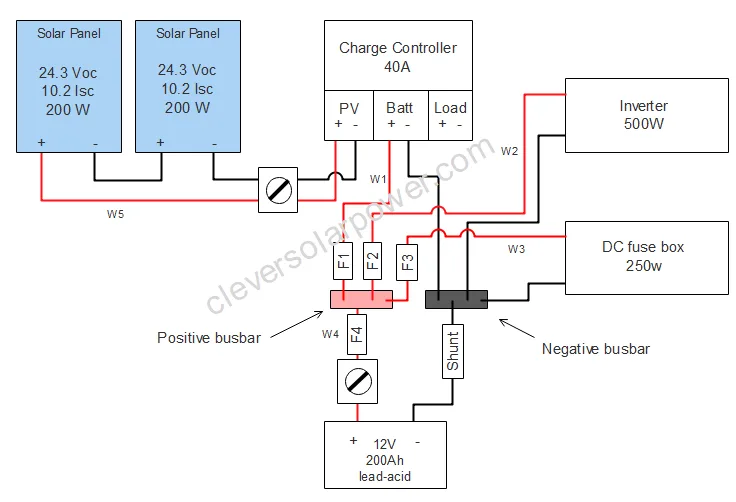
Wiring a busbar in a solar power system involves connecting the various components of the system, such as the solar panels, charge controller, and batteries, to the busbar. Here’s a general guide on how to wire a busbar:
- Mount the Busbar: First, mount the busbar on a non-conductive, fire-resistant surface. The busbar should be located close to your battery bank and inverter to minimize the length of the cables and thus reduce power loss.
- Connect the Battery: Connect your battery to the busbar. Again, the positive terminal should be connected to the positive busbar and the negative terminal to the negative busbar.
- Connect the Charge Controller: Connect the output cables from your charge controller to the busbar. The positive cable should be connected to the positive busbar and the negative cable to the negative busbar.
- Connect the Inverter: Finally, connect your inverter to the busbar. The positive input cable of the inverter should be connected to the positive busbar and the negative input cable to the negative busbar. If you have a big inverter (>1000W), there will be a spark. This is caused by the charging of capacitors in the inverter. Consider using a pre-charge resistor for 5 seconds to avoid the spark. If the spark is big, the stud will become unusable (don’t ask me how I know this).
Terminal block VS Busbar
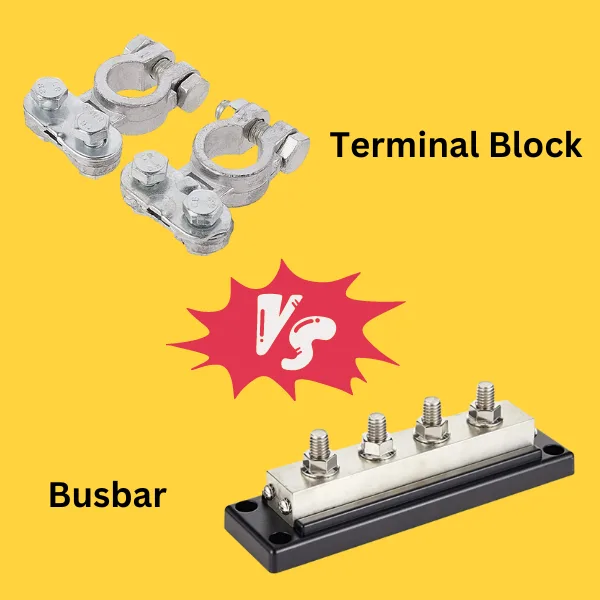
A terminal block, or battery busbar, is a specific type used in battery systems, including those in solar power installations. It serves a similar function as a regular busbar, but it is specifically designed to connect multiple batteries in a battery bank. By connecting the batteries via the battery busbar, the electrical current can be evenly distributed across all the batteries, ensuring they charge and discharge at the same rate. This helps to maintain the overall health and longevity of the battery bank.
If you have more than one battery, I recommend going for the standard busbar, but if you only have one battery, then you can use a terminal block as a busbar.
Make sure the terminal block fits the stud of your battery. Most LiFePO4 batteries now have M6 or M8 screw terminals. Make sure the current rating is enough for your maximum amount of current.
Recommended busbars
150A two stud busbar for smaller systems: check price
Blue Sea 100A busbar: check price
250A positive + negative busbar: check price
Blue Sea 600A busbar: check price
[custom-related-posts title=”Related Posts” none_text=”None found” order_by=”title” order=”ASC”]
I’m an off-grid enthusiast. I created this website to give clear and straight-to-the-point advice about solar power. I’m also the author of the book ‘Off-grid solar power simplified‘. Read more about me on my about page, check out my Youtube channel, or send me a message.