A power station is easy to build. It is ideal for camping or as an emergency backup plan.
This will be suitable to run a fridge for one day, charge your electronic devices, and power some lights.

Let’s get started by ordering the components:
- 12V 100Ah Battery
- 1000W inverter
- 10A Charger
- Shunt
- Wires
- Fuses
Components for the DIY Power Station
Battery
We will use a 12V 100Ah battery from LiTime (previously known as amperetime). It’s a good brand that has been in business for a while. I don’t think we will see them disappear soon (important for warranty).
The battery has a capacity of 1.200Wh:
12V * 100Ah = 1.200Wh
We can run a fridge for one day. Because a large fridge has an estimated power draw of 100W at a duty cycle of 30%.
100W * 24 hours * 30% = 720Wh
If the inverter is on 24 hours a day, this will also draw power. The estimated power draw from the inverter is 20 Watts.
20W*24 hours = 480Wh
In total we get:
720Wh + 480Wh = 1.200Wh
If you want to expand the battery capacity, you can add another battery in parallel, which will look like this:

Inverter
I have chosen for the Giandel 1000W inverter. We use 1000W because the startup power draw from the fridge can be 6x its power rating. So if we want to power a 100W fridge, then we need at least 600W.
100W * 6 = 600W
If you don’t need to power a fridge, then I recommend using the 600W giandel inverter. Having a smaller inverter will save you idle power as we have discussed in the battery section and you will need smaller wire sized and fuses. We will talk about these soon.
Charger
We are not going to use the sun to recharge our batteries. If you want to see a system where we charge from solar, then I recommend reading my DIY solar generator guide. To keep the system simple and affordable, we will use a 10A Lithium battery charger.
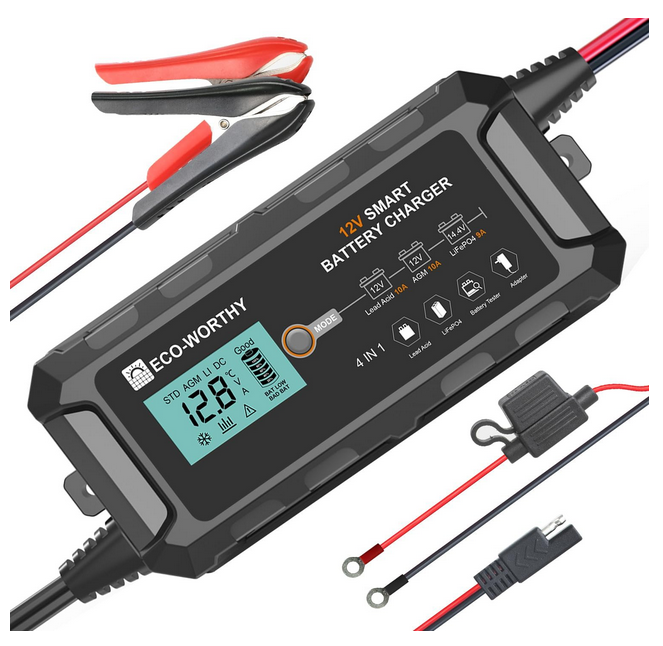
The battery charger has an integrated fuse. This comes in handy because we don’t need to add an additional fuse. It also has ring terminals, which can be attached to the terminals.
Shunt
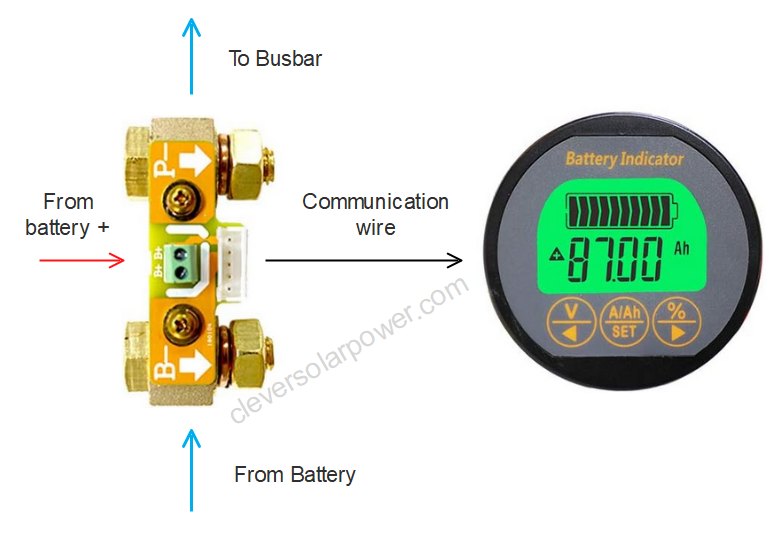
In order to see the remaining capacity of the battery, we need a shunt. With lead-acid batteries, you can estimate how much % is left in the battery by measuring the voltage, but because we have lithium, it’s very hard to determine the battery % on voltage alone.
The shunt reads how much power is going in and out of the battery. We can read the remaining battery capacity on the display.
We will choose the Aili shunt for this. This is how to wire it:
Read more about the shunt in my article here.
Wires
Now we have come to the fun part!
Before calculating the wires, we need to know how much current runs through the circuit.
W1: 1000W inverter / 12V = 83.33 * 1.25 safety factor = 104A
W2: 10 A charger * 1.25 safety factor = 12.5A
Now, we need to select the correct wire sizes for W1 and W2. We use the 2007 ‘NEC Ampacity Ratings for Insulated Conductors’. A complete table can be found here.
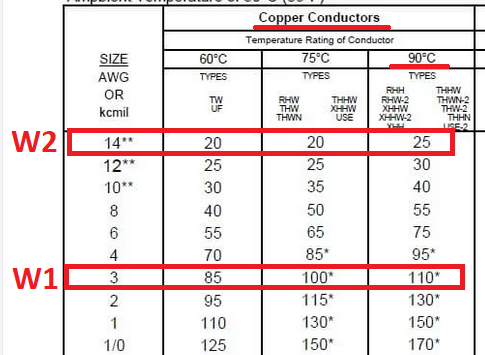
- We need a 3AWG cable for the wire to the inverter (W1).
- We need a 14 AWG cable for the wire coming from the charger (W2).
We can convert the AWG wires into mm² for people who don’t use AWG. These are the following:

- W1 becomes 35mm² because there is no 3AWG conversion available, so we have to take the first up from there.
- W2 becomes 2.5mm². The charger already comes with wires, so we don’t need to order these.
Fuses
Next we need to calculate the fuse sizes. The fuses protect the wire, so we have to size the fuses lower than the current capacity of the cables.
For example, if the cable can carry 60Amps, we need to fuse with 50Amps.
- F1: This wire is rated at 110Amps. The closest fuse size under 110Amps is a 100Amp fuse.
- F2: This wire is rated at 25Amps. The closest fuse rating we can find under 25A is a 20A fuse.
Check the bottom of this page for the different fuses and their sizes.
- F1: We can use a 100A MIDI/AMI fuse for the main inverter fuse.
- F2: Since we use the charger with an integrated fuse, we don’t need to add another.
Putting it all Together
Coming soon!

I’m an off-grid enthusiast. I created this website to give clear and straight-to-the-point advice about solar power. I’m also the author of the book ‘Off-grid solar power simplified‘. Read more about me on my about page, check out my Youtube channel, or send me a message.
Hello Nick
Above at the battery section i confused from where the 20W come from.
If the inverter is on 24 hours a day, this will also draw power. The estimated power draw from the inverter is 25 Watts.
20W*24 hours = 480Wh
Sorry, that’s a typo. Should have been 20W instead of 25W. I have corrected it, thanks!