In my journey of creating tutorials on off-grid living, I’ve come across various battery monitors, but the AiLi Battery Monitor stands out for its versatility and reliability. It’s a gem for anyone delving into off-grid setups, offering a broad voltage compatibility range. This feature alone makes it a valuable asset, as it seamlessly adapts to different power systems, which is essential in off-grid living.

The AiLi’s precision in monitoring battery percentage, voltage, and current is a major plus. It provides accurate data, which is crucial when teaching about efficient energy management. The clarity of its large LCD screen is another benefit.
What makes the AiLi particularly appealing for off-grid enthusiasts, and a frequent mention in my tutorials, is its balance between comprehensive functionality and affordability. It’s user-friendly, which is great for those who are new to off-grid living. The installation is straightforward, a factor I often emphasize in my guides for DIY enthusiasts. Additionally, its capability to track and store historical battery data is invaluable for long-term energy management strategies.
That’s why I have recommended this battery monitor in my article about the best battery monitors for RV’s.
Specifications
- Voltage Range: It usually supports a wide range of voltages, making it compatible with various battery systems (commonly 12V, 24V, 36V, 48V, 60V, 72V, 84V, 96V).
- Current Measurement: The AiLi monitor can measure currents up to a certain limit, often around 350A, which is suitable for most recreational and off-grid applications.
- Display: It typically features a large LCD screen that provides clear readings of various parameters like battery percentage, voltage, current, power, and energy.
- Precision: The AiLi Battery Monitor is known for its high precision, with voltage detection precision often reaching 0.01V and current detection precision around 0.01A.
- Battery Capacity Range: It’s designed to monitor battery systems with capacities up to a certain limit, often around 999 Amp hours.
- Data Tracking: The monitor usually tracks and displays a variety of parameters, including voltage, current (charge or discharge), number of amp-hours (charge or discharge), state of charge, and time to go (autonomy). It may also store historical event data like max and min voltages, max currents, and max power.
- Power Supply: The AiLi Battery Monitor typically draws its working power supply directly from the battery it’s measuring.
- Mounting: The device often comes with a standard mounting hole size for installation, which is usually around 2.1 inches.
- Compatibility: It’s compatible with a wide range of battery types, including standard lead-acid, AGM, gel, and possibly lithium batteries, depending on the model.
How to wire the Aili Battery Monitor
Identify Installation Location:
- Choose a location for the display unit that is easily visible and accessible.
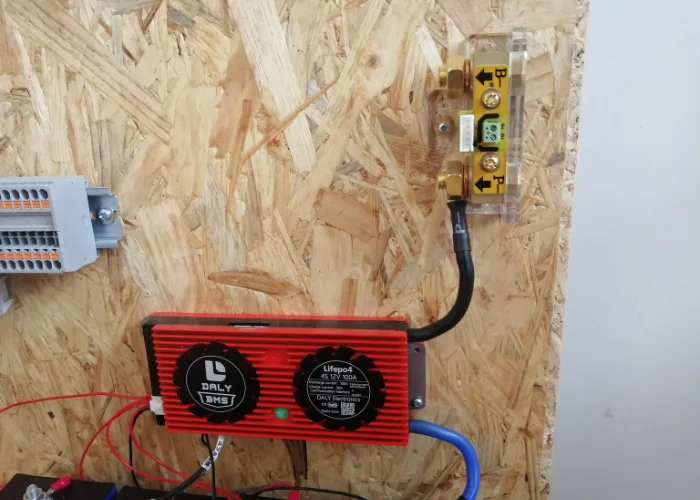
- The shunt should be installed close to the battery, on the negative side.
Install the Shunt:
- Disconnect the negative terminal of your battery.
- Connect the shunt directly to the negative terminal of the battery. This is crucial as the shunt will measure the current flowing through it.
- Ensure all negative loads (i.e., negative wires leading to your RV’s systems) are connected to the other side of the shunt. This means that all current flowing from the battery will pass through the shunt.
Wire the Display Unit to the Shunt:
- Run the provided cable from the display unit to the shunt. This cable transmits data from the shunt to the display.
- Connect one end of the cable to the appropriate port on the shunt and the other end to the back of the display unit.
- Secure the connections and ensure they are tight and corrosion-free.
Connect the Power Supply to the Display:
- The display unit requires a power supply, which is usually drawn from the battery.
- Connect a wire from the positive terminal of the battery or busbar to the positive input on the display unit. This wire is not included (check here for fused wire).
- Ensure this connection is fused for safety.
Finalize Installation:
- Mount the display unit securely in the chosen location.
- Reconnect the battery’s negative terminal.
- Turn on the system and check the display unit for proper operation.
Program and Calibrate:
- Program your capacity in Ah into the shunt and charge your battery to 100%. If your battery is charged to 100%, then you must calibrate the battery monitor.
Conclusion
In summary, the AiLi Battery Monitor is an excellent recommendation for anyone involved in off-grid living, whether as a novice or an expert. Its versatility, ease of use, and cost-effectiveness make it a top choice in my off-grid tutorials. It provides users with the essential data needed to maintain optimal battery health, ensuring a reliable and efficient power system in their off-grid adventures.
Read more: How to wire two shunts in series

I’m an off-grid enthusiast. I created this website to give clear and straight-to-the-point advice about solar power. I’m also the author of the book ‘Off-grid solar power simplified‘. Read more about me on my about page, check out my Youtube channel, or send me a message.