This DIY solar system with battery storage expands the DIY home battery backup system without solar.
This system adds solar panels to make it a complete off-the-grid system. We call this kind of system a DIY solar battery backup or a DIY home solar battery system.
However, it’s still a small system used to run your refrigerator, well pump, or several lights during a blackout. It’s not meant to be used continuously. This system is ideal for preppers or emergency preparedness.
Parts:
- 2pcs 100W solar panel
- 20A Charge controller
- 30A fuse holder wire
- mc-4 fuse holder 10A
- 20ft 12AWG solar cable
Explanation of the Solar System
Selecting the Solar Panels
The solar panels should charge the battery in one day. In most locations, the amount of sun hours per day is 3. Remember that our usable battery capacity was 600wh? If we divide 600wh by 3 hours, we become 200 Watts. So we need 200 Watts worth of solar panels to recharge the battery in one day. To keep the installation portable and the current low, we will use two 100-watt solar panels. The solar panels can be from any manufacturer like santansolar or renogy.
Selecting a Fuse for the Solar Panels
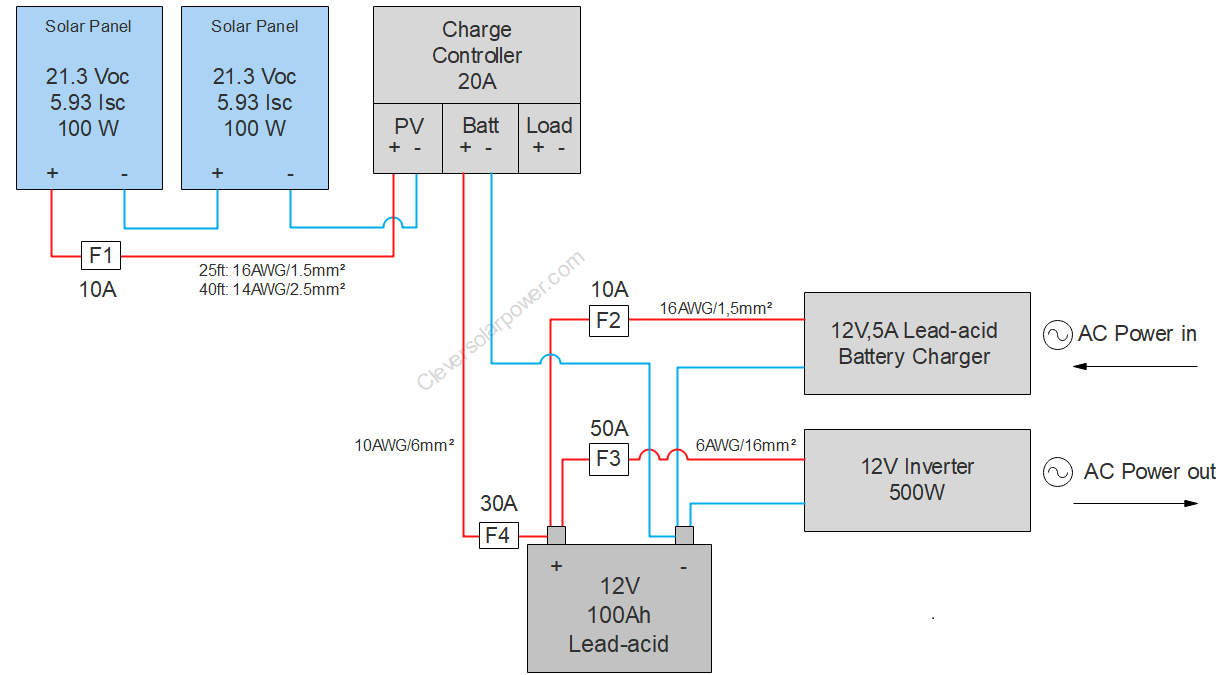
We need a fuse between the solar panels and the charge controller. The size of the fuse will be indicated on the solar panel specifications. In this case, the maximum series fuse is 10Amps. We will use a 10A MC4 fuse.

Wiring the System
Next, we will wire the solar panels to the existing system. As you can see on the schematic, the two solar panels are wired in series. That means that the negative of the first panel is connected to the positive of the second panel. If we do that, we will have one positive and one negative wire. After we have attached the 10A MC4 fuse, we can put both ends into the MPPT charge controller.
Calculating the Voltage Drop
The wires from the solar panels to the charge controllers will be longer than other wires in the system. That’s why we need to do a voltage drop calculation. I have made a video about why we must do this.
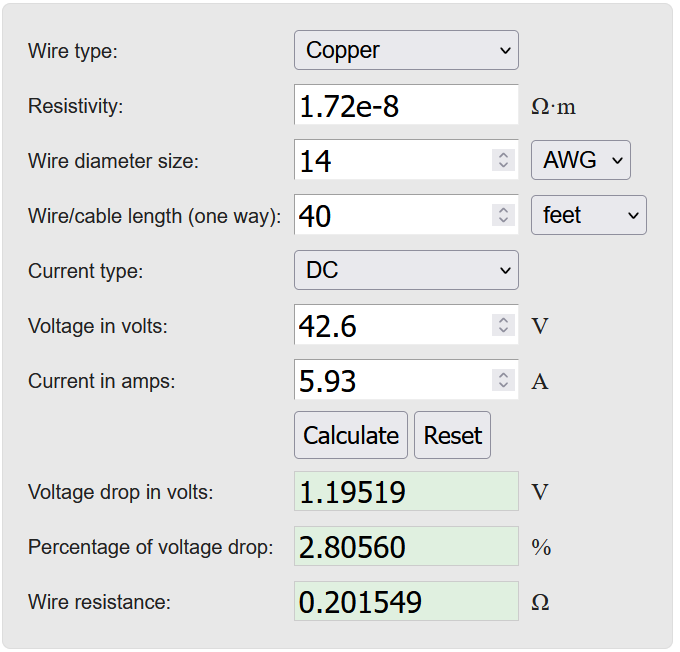
We will multiply the open circuit voltage of the solar panel by two because we have two panels wired in series. This adds up the voltage. Check out my video about wiring in series or parallel for more information on why we wire in series.
We now become 42,6Volts. The current stays the same at 5,93Amps. Now we have everything we need to calculate the voltage drop except the distance to the charge controller. I will calculate two wire lengths, one 25 feet, and one 40 feet. As a rule, you must keep the total voltage drop under 3 percent. In example one, we need a 16 gauge wire; in the second example, we will need a 14 gauge wire. In reality, there are only 10, and 12-gauge extension wires sold online, so we will use a 12-gauge cable with mc4 connectors.

Adding the Charge Controller
Now we need to select the charge controller. We have to calculate two things here.
- The first is the current to the battery,
- The second is the maximum input voltage of the charge controller
If we divide 200W of solar by 13V charging voltage, we become 15.4 amps. We must multiply this by a safety factor of 1,25 to become 19,25 amps. We can use a 20 amp charge controller.
The total voltage of the two panels is 42,6Volts. We also have to multiply this by a safety factor of 1,25 to become 53,25V. This is under 100V. Combining these two values, we can select a charge controller that is 20Amps with a maximum input voltage of 100volts.
Selecting Charge wire and Fuse
Lastly, we must select the wire from the charge controller to the battery. The charge controller will put a maximum of 20 amps into the battery, so we need a wire that can handle 20Amps.
To calculate the minimum fuse size, we have to calculate the current that goes through the wire, which is 20amps. We multiply that by the 1,25 safety factor to become 25Amps. The wire can be 12 gauge, but since there is no 25Amp fuse, we have to use 10 gauge.
The maximum fuse for a 10 gauge cable is 35A. Now we need to choose a fuse that is in between these two. We will use a 30A fuse. The maximum length will be 6ft. Keep this distance as short as possible.

Cost
The total cost for this system is everything from the previous video, plus the extra components we have added to this system. These are:
- Two solar panels for a total of 180 dollars.
- 20 feet solar extension cable for 23 dollars,
- An inline mc4 fuse for 16 dollars,
- A 20a charge controller for 80 dollars,
- 10 gauge battery cables with fuse holder for 15 dollars
We have 314 dollars plus 304 dollars from the previous installation. The total for this system is 622 dollars. The links to these parts are at the top of this page.
Conclusion
You now have made a DIY home solar battery system. Adding a few solar panels to an existing system is relatively easy.
If you are interested in learning more, you can read my bestselling book about off-grid solar power.
 I have written a book that contains all the information you need to get started with off-grid solar power.
With over 1,400 reviews at 4.5 stars, I can almost guarantee that this book will save you $100’s on buying the right equipment.
You can buy it here on Amazon.com

I’m an off-grid enthusiast. I created this website to give clear and straight-to-the-point advice about solar power. I’m also the author of the book ‘Off-grid solar power simplified‘. Read more about me on my about page, check out my Youtube channel, or send me a message.