This DIY home battery backup is perfect for preppers and to use in an emergency. This system can run a fridge and a few lights for several hours during a power outage.
The system doesn’t include solar panels to keep it simple.
Video of the DIY battery backup
Explanation of the System
Parts list
- 12V 100Ah battery
- 500W inverter
- 12V 5A battery charger
- 6AWG cables (2ft)
- ANL fuse
- Voltage monitor (optional)
System Overview + Diagram
This diagram includes everything you need to know, from fuse to wire sizes.
We have a 12V 100Ah AGM lead-acid battery. We will charge the battery with a 5Amp charger, which equals 60 watts. Then we will have a 500W inverter so you can power your AC loads.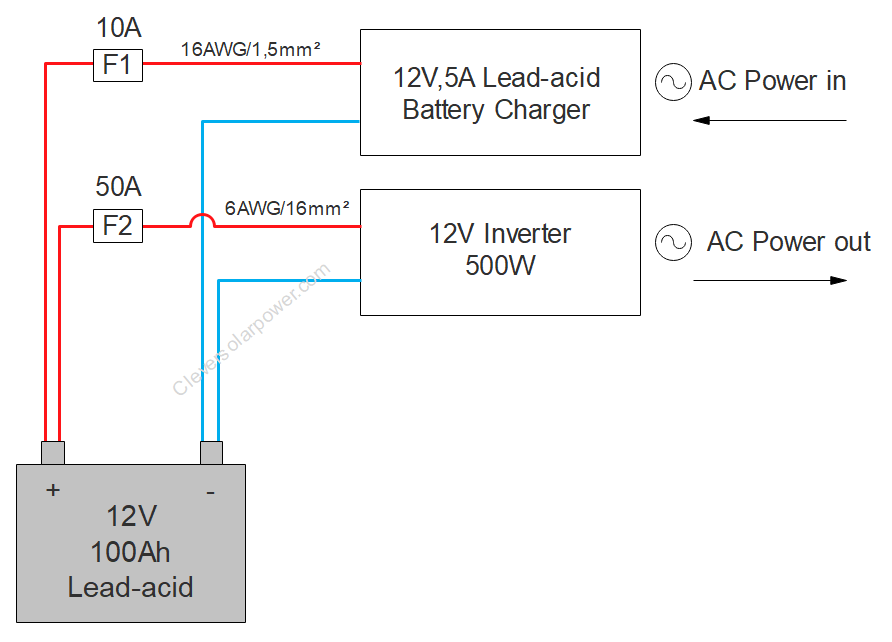
Required fuses
Let’s start by taking a look at which fuses you will need. For the charger (F1), you will need a 10Amp fuse. We choose 10amps because this is the closest to 5Amps. The charger we will use already has an inline 10A fuse. So we don’t have to add one.
The power of the inverter is 500watts. If we divide 500watts by 12volts, we become 42Amps. The closest fuse to 42Amps is 50Amps (F2). We will use an ANL fuse because it will match the M8 screws on the battery terminals. We will screw these directly on the battery terminal.

Selecting Wire Sizes
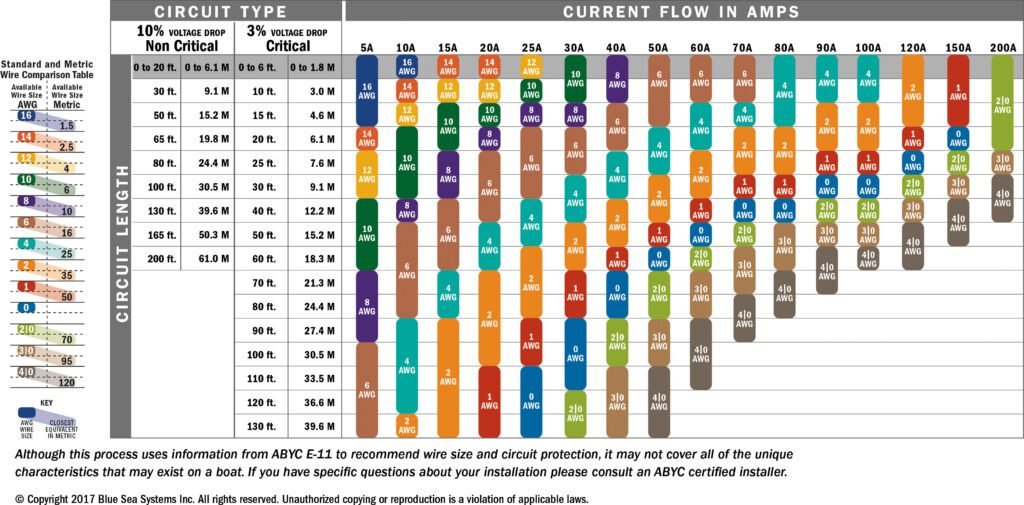
Now we will take a look at the wires sizes. The charger delivers 5Amps to the battery. If we use the table, we can see that we can use a 16 gauge or 1,5mm squared wire. The current from the inverter is 42Amps. The closest we can see in the table is 50Amps. If we keep the length of the wire under 6ft, we can see that we can use a 6 gauge or 16mm squared wire.
C-rate Explanation
What about C-rate? The normal C-rate of a lead-acid battery is .2C. This means that our 100Ah battery can deliver a nominal charge and discharge current of 20Amps. We can calculate this is only 240watts.
To make a perfect system, you will need to add another battery in parallel to respect the C-rate of the battery. If your load is higher than 240Watts, then the capacity of the battery will be reduced. If you want to learn more about c-rate, I recommend watching my video.
Charge and Discharge time
Let’s look at the charge and discharge time. The 12V 100Ah battery contains 1200watt hours. But only 50% of that is usable. Otherwise, the battery will degrade fast. This leaves us with 600Wh.
If the fridge or load you are using is 100watts, then you can use the battery for 6 hours. After you have run the battery to 50%, we need to recharge it.
To recharge 600Watt hours, we divide it by the power the charger delivers. This equates to a 10-hour charging time.
There are no losses mentioned in these calculations. Running the inverter non-stop will drain the battery. Only turn on the inverter when you use it.
Cost of the System
Here is a list of the components you need to make this system.
- A battery from Renogy which will cost you $200
- The inverter has good feedback online which will cost you $46
- The 5amp battery charger will cost you $36
- The ANL fuse will cost you around $10
- The 6 gauge cables with lugs will cost you $16
The total cost of this system is 308 dollars. Optionally you can get a battery voltage monitor, which will tell you how much power is left in the battery.
Conclusion
This system is easy to make and doesn’t require tools. If you want to see how to add solar panels to this system, you can read the next article in this series here: DIY Solar Battery Backup

I’m an off-grid enthusiast. I created this website to give clear and straight-to-the-point advice about solar power. I’m also the author of the book ‘Off-grid solar power simplified‘. Read more about me on my about page, check out my Youtube channel, or send me a message.
Very good, simple costing and instruction. Do you have anything like for 3 to 5 kw system with battery storage. And I will have my separate wiring for lights, TV, washing machine and electric plug-in oven. So, I don’t disturb the main grid.
Do you mean 3 to 5kw of solar panels? I don’t have it available yet, but I’m working on one. Thanks!