In this article, I will show you how to make a DIY solar generator. This has quite some benefits:
- More battery capacity
- More solar input
- You know how everything works
- A good project to have in case of a blackout
- Cheaper
- Expandable
We are going to make our generator using the following steps:
- Choose a Battery
- Choose an inverter
- Choose the AC charger
- Choose a charge controller
- Connecting it all
Steps to making a DIY solar generator
1. Choose a battery
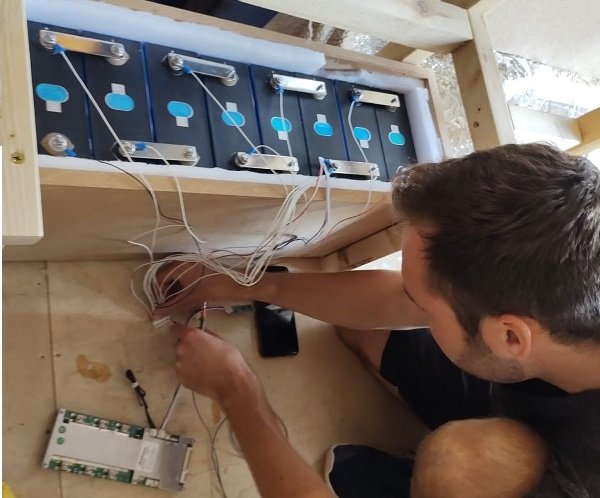
You can purchase a battery or make your own LiFePO4 battery. In my case, I made my own battery. It is 4 Lithium iron phosphate (LiFePO4) cells connected in series to make a 12V lithium battery. Easy!
If you purchase a battery online, you will have the same. Just a little less messy.
My battery is 280Ah at 24V (6,700Wh) and costs me $1600 to make. That is $0.24/Wh, which is pretty good if you ask me.
A 24V 100Ah (2,400Wh) battery from a reputable brand will cost you $1,000. That is $0.41/Wh.
Let’s buy a 24V 100Ah battery from SOK. The higher voltage means we have several advantages. These are:
- Thinner wire (cheaper)
- smaller charge controller (cheaper)
Checkout my article about the best budget LiFePO4 batteries here.
2. Choose an inverter
For the inverter, we need to choose a 24V model. Let’s use the Giandel 2000W. You can also use the cheaper 1200W version if you want to. The 1200W version is enough to run your fridge. Check out my article about the best off-grid inverters to explore more options.
We will talk about sizing the wires and fuses later in this article.
3. Choose an AC charger
For the AC charger, we will add a DC charger, use the output, and put it on the input of the solar charge controller.
The output of the DC charger will be 48V. This is ideal as an input voltage on the solar charge controller. This trick saves us an extra lithium battery charger. Thanks to Will Prowse for the trick.
The total power this charger provides is 480W. Check the connection diagram to connect this to the solar charge controller.
4. Choose a charge controller
We will choose the popular EPEver Triron 30A charge controller.
It can charge the battery at 30A, is rated for a 24V battery, plus has lithium settings. The maximum input voltage of the charge controller is 100 Volts.
This means we can have a maximum of 720W solar panels attached to the charge controller.
Make sure you stay under the max allowable upper limit of 100V.24V * 30A = 720W
If you don’t like to add solar panels, then read my guide on how to make a DIY Power Station
5. Connecting it all
In the schematic below, you can see how everything should be wired up. This includes the wire sizes and the fuses.
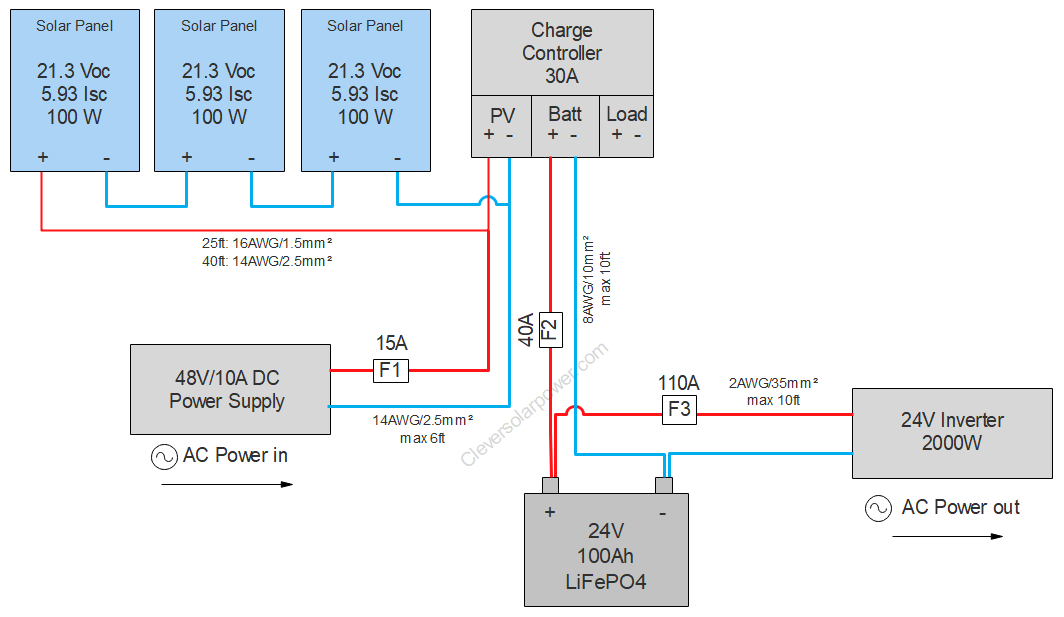
Reasoning behind the wires and fuses
The solar panels don’t need fuses. This is because they are placed in series. We needed fuses and a combiner box if another parallel string was connected.
F1: The fuse from the DC power supply delivers 10A. We must apply a safety factor os 125%
10A*1.25=12.5A
A wire that can carry 12.5A is a 14AWG or 2.5mm² wire. We need to fuse the wire with a fuse greater than the current of 12.5A and a fuse lower or equal to the current rating of the wire. This will be a 15A fuse.
F2: This is the wire from the charge controller to the battery. Same holds true here for the 125% safety margin.
30A*1.25=37.5A
A wire that can carry 37.5A is 8AWG or 10mm². Now we need to fuse this wire. An 8AWG wire can carry 40A, so we will need to use a fuse between 37.5A and 40A. We will choose a 40A fuse.
F3: This is the biggest fuse in the system. First we must calculate the current through the wire.
2000W/24V=83.3A
Then we must apply the safety factor of 125%.
83.3A*1.25=104A
A wire that can carry 104A is a 2AWG of 35mm² wire. Now we need to fuse the wire. A fuse between 104A and 120A would be 110A.
Because we are working with a lithium battery, we need a Class-T fuse. This special fuse can interrupt high currents thanks to its internal sand. It will extinguish the arc if there is a short.

When you connect the battery cables to the inverter, there will be a spark. This is normal. However, this is not desirable. Therefore I recommend using a pre-charge resistor every time you connect your battery to your inverter. Connect the negative first and then put the resistor between the positive from the inverter and the battery positive terminal. Hold it for a few seconds. The capacitors inside are now charged.
The thickest wire should be the first on the battery terminals. In this case, it will be the cable from the inverter and the cable from the charge controller on top.
Shopping List for the DIY Solar Generator Kit
| Part | Cost |
| 24V 100Ah Battery | $1000 |
| 30A Charge controller | $127 |
| 48V 10A DC power supply | $40 |
| 24V 2000W inverter | $370 |
| DC power supply to charge controller wire | $20 |
| Charge controller to battery wire | $20 |
| Battery to inverter wire | $23 |
| F1 + fuse holder | $10 |
| F2 + fuse holder | $10 + $8 |
| F3 | $30 |
| Total | $1688 |
Conclusion
You can now build your own portable solar generator from scratch.
- This system is modular when we compare it to solar generators.
- It also has more power for a reduced price.
- If you are a DIY person, then this system isn’t too hard to do.
 I have written a book that contains all the information you need to get started with off-grid solar power.
With over 1,800 reviews at 4.5 stars, I can almost guarantee that this book will save you $100s on buying the right equipment.
You can get it here on Amazon.com

I’m an off-grid enthusiast. I created this website to give clear and straight-to-the-point advice about solar power. I’m also the author of the book ‘Off-grid solar power simplified‘. Read more about me on my about page, check out my Youtube channel, or send me a message.